Quick Start Guide
This guide provides an overview of the end-to-end flow of using NetSpring, starting with accessing the platform, creating an application, connecting to a data warehouse, defining a dataset, building an exploration, and ending with building and sharing a dashboard.
Use the step-by-step instructions below to create and share a basic analysis on the NetSpring platform.
Step 1: Log into NetSpring
First, access the NetSpring platform.
- Access the NetSpring web application URL on any browser of your choice.
- Enter your username and password as provided by the NetSpring Administrator.

- Click Sign In.
If encountering any difficulties logging into NetSpring, reach out to your NetSpring Administrator or use the Support portal for assistance.
Step 2: Create an Application
Create an application within your organization to store all data and analysis we will generate in the subsequent steps.
- On the left navigation panel, click the Application button and then click + beside the Organization name to create a new application within that Organization.

- In the Creating new application dialog that appears, enter the application details.

- Give a Name to the new application.
- Enter the Description.
- Select the Avatar and Color of your choice.
- Click Next step: "Setup Connection" to proceed to data connection setup.
- Select your preferred data warehouse and click Next. For this Quick Start guide, we are using Snowflake.
- Enter the Connection Setup details.

- Enter your Snowflake account JDBC Driver Connection String for Account URL.
- Enter your Username and Password.
- Click the clockwise arrow icon next to the Health field to test your connection. A successful connection appears in green and shows as good; in case of failure, it displays an error.
- Click Confirm to finish the application setup. After successful creation, the new application will appear under your Organization. You can verify this by clicking the Application button on the left navigation panel.
Step 3: Create a Dataset
Create a dataset to access data for analysis.
- On the left navigation panel, go to Data > Datasets.
- On the Datasets page, click New Dataset at the top and choose Source Dataset.

- In the Create Dataset dialog, navigate to the Pick a Source section on the left and expand the database using the tree view. We have used an example "SPRINGSIGHT" database for this Quick Start guide.

- Expand the schema and select the required table or view. In this example, we've used the "PRODUCT_INTERACTIONS_VIEW" view from the "PUBLIC" schema.
- To preview the selected data, click Preview in the Source Preview section on the right, then click Confirm to move to the dataset definition.

- On the dataset definition page that appears, provide a name for the dataset, such as "Product Interactions" in this example, choose the destination folder, and then click Save.

- Proceed to the Primary Keys tab to define the primary key, enabling the use of the dataset.

- Click + Add and select the required column from the dropdown list, such as the "PK" column in this example.
- Click Save.
- Annotate the dataset as an event stream. To do that:

- Go to the Semantics tab.
- Choose Event Stream in the This is an drop-down.
- Click + Add under Event Streams.
- In the Product Interactions are events that occur at field, find and select the column that orders the event by time, such as "INTERACTIONTIMESTAMP" in this example.
- In the with event type field, find and select the event type column, such as "PAGETITLE" and for the where active event is field, choose "ISINTERACTION".
- Click Save.
You have now successfully set up your first dataset. You can view it on the Dataset page.

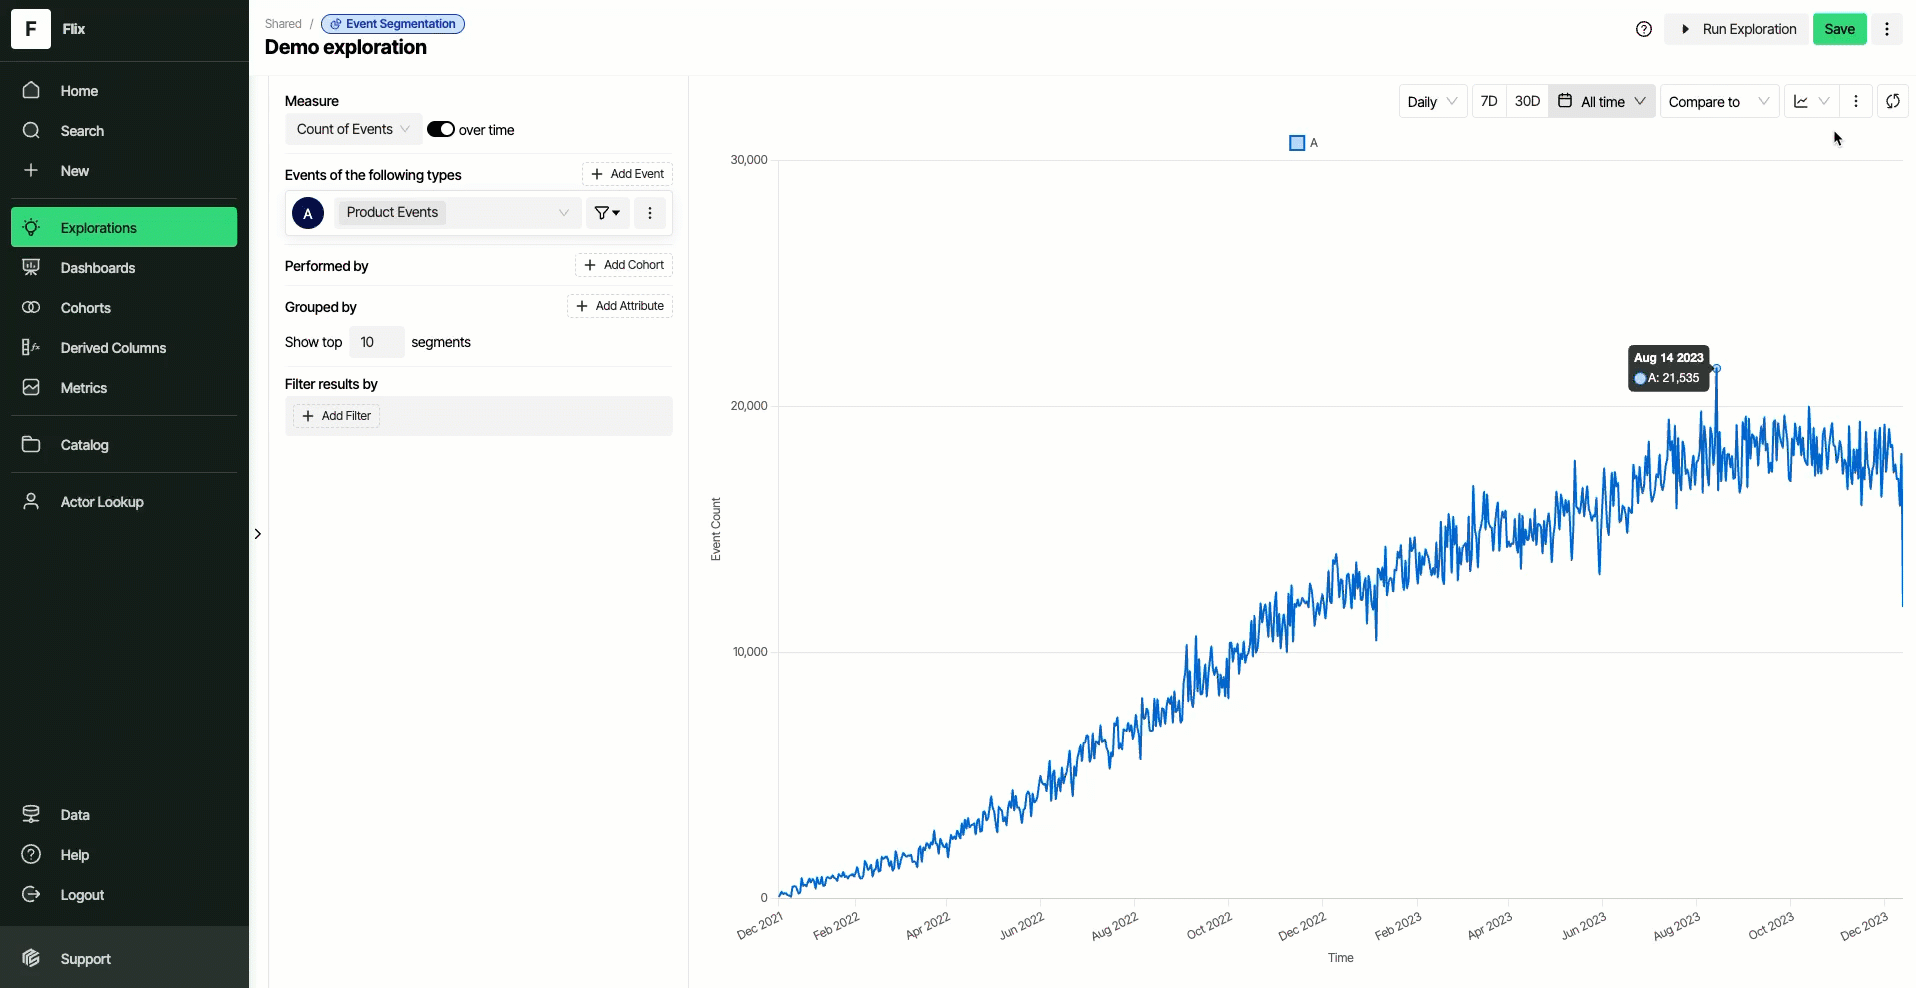
Step 4: Build an Exploration
Build an exploration using the dataset you created.
- On the left navigation panel, go to Exploration.
- Choose a template from the list of available exploration templates, such as "Event Segmentation" used in this example.
- On the definition page, under the Events section, click + Add Event to view the event picker.
- Select one or more events from the dropdown list. For this guide, we have selected "All Events" to display a count of all product events.
- Click Run Exploration to display a chart in the visualization window.
- Give a name to the exploration, add a description, if required, and click Save.
You have now successfully generated your first exploration chart.

Step 5: Create a Dashboard
Now, let's add the chart to the dashboard.
- On the exploration definition page, hover over the chart to view and click the Add to Dashboard button and select + New Dashboard. This creates a new unnamed dashboard and adds the chart to it. You can also resize the tile, or drag and drop it to place it anywhere on the dashboard.
- Click + Add Tile and select Text to add a text tile to the dashboard. You can add multiple tiles to a dashboard using the + Add Tile button.
- Click the pencil icon on the tile, and add a Title and Description for the text tile. To save, click outside the dialog.
- Give a name to the dashboard, and click Save.
Congratulations! Your first dashboard is successfully created on NetSpring.